How to Assign A M4841A Telemetry Device
July 18, 2018

During the course of use, medical telemetry transmitters can become disconnected from their central station. This often happens after a telemetry transmitter has been serviced, or inactive for a period of time.
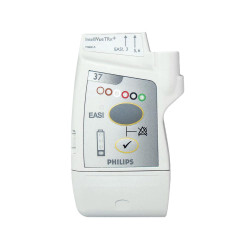
Use this guide to reassign a Philips M4841A TRx Telemetry Transmitter to its central station. Before you begin this process, be sure you have no ECG leadset or SpO2 sensor connected to the device.
1) Power on the transmitter
First, insert two double A batteries into the battery terminal. Once your device powers on its going to go through the post cycle power on self-test. It should go into the mode with the LED lights flashing consecutively, known as the factory default setting.
2) Enter password
Once you reach the default setting, go to the "All Controls" button which is in the bottom right hand corner of your screen. Next, go to "Label Assignment" and enter your password which in this case is the word "tele" in lower case.
3) Find MAC Address
Now you need to find the "mac address" under the "new devices" section. An easy way to confirm your "mac address" is to look for the last four digits of the "mac address" in the battery terminal of your device.
4) Assign Label
Once you have located the mac address in the "New Devices" section. Highlight it and select an unassigned label. Confirm the assignment by clicking on the "Assign Label" button.
5) Perform Assignment Procedure
Now, simply press the "Check Mark" on the front of your telemetry transmitter which will instruct the unit to perform the assignment procedure. This will end with a power cycling of the unit followed by a leads off error. Label assignment is now complete.
You may now connect your patient monitoring cable accessories.


