#TechTipTuesday: CT Scanners
January 4, 2021
By Kaylee McCaffrey, Biomedical Engineering Solutions Sales Specialist
It’s #TechTipTuesday! Welcome to our weekly series where we ask members of the biomedical community about their tips and recommendations for maintaining medical equipment. This week we’re asking, “What tips do you have when it comes to CT scanners?”
How to Access and Evaluate the Siemens CT Tube Report
This week, we asked Brandon Young, an Engineer at Avante Health Solutions, for his tips on accessing and evaluating the Siemens CT Tube Report. Read Brandon’s tips below:
Step One
At the top of the main screen navigate to the Options drop down menu, the third tab from the right. In the Option menu list select the Service tab. A sub menu to the right will appear, then highlight and select the Local Service Option with a right click of the mouse. The Service Software Desktop should open as shown below:

Step Two
Enter the 20-character alpha numeric password. The left field uses the first 14 characters, and the right fields requires the last six characters. Typically, the left field will be auto-filled only requiring the last six to be entered.
*If no password is available both fields can be left blank and limited Level Service 1 (Customer) can be accessed. If you start Reports with Service Level 1 (Customer), only the tube history header of the currently installed tube(s) will be displayed.
Step Three
The Service Software Home Page will appear as shown below. Move the mouse to the top right corner of the home page and select Reports.

Step Four
At the bottom of the left column the heading Tube will be displayed. The Tube History can be accessed by selecting current history which will allow the user to see the history of the tube which is currently installed. Alternatively, All Histories can be selected which will list the files for all tubes that have been installed on the system.

Step Five
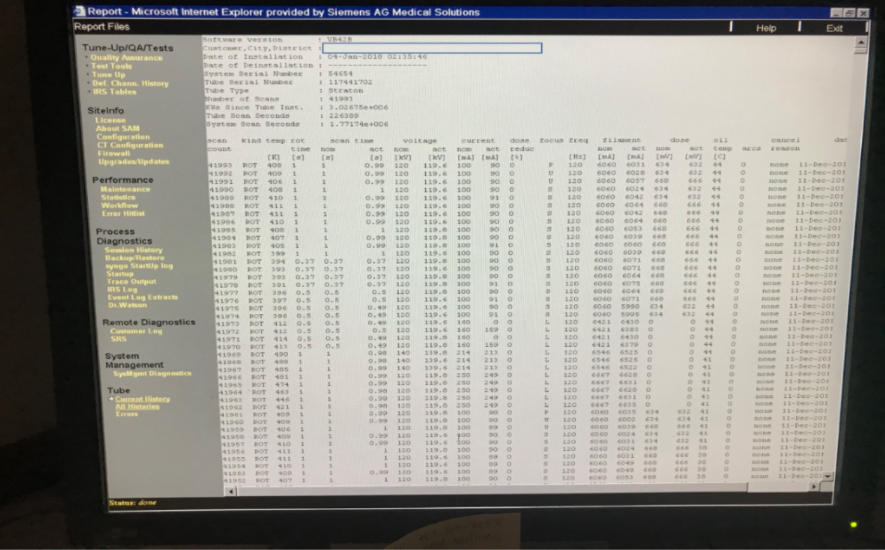
When the Current Tube is selected the window to the right show the current summary of the tube installed. In the top part of the file is a summary of all the tube information. Below is a summary of each scan that produced X-ray.
Step Six
Selecting All Histories will change the screen to the right depicting a list of files for not only the current tube but separate files for all the tubes that have been installed and the reason for which they were replaced. To exit program, move the mouse up to the word exit and click on it.

Share Your Own Tips on LinkedIn!
Huge thanks to Brandon for giving us today’s tips on CT Scanners! Want to join the conversation and add your own tips? Be sure to follow me on LinkedIn and comment on today’s #TechTipTuesday post. See you next week!